Level Editing off the Beaten Path
First a quick story. Most game jams I participate in, despite best intentions, result in a confusing mess of a game on the verge of unplayability. Even the more successful efforts only offer a few minutes of play. Granted, going from nothing to a playable game in one or two days is nontrivial, so expecting anything meatier than a quick mechanics demo is unrealistic.
I continued thinking this until Global Game Jam 2010. Our six person team built a trainwreck of a game, with a 3D world and GPU-melting particle effects and bombastic beats straight outta GarageBand. Far more impressive was a 2D platformer that another developer, the talented Danny Yaroslavski, built in the same weekend called I Hate Ice Levels. The visuals were slick and the gameplay punishing (in a good way; think Super Meat Boy). The best part though was the amount of content. By the time the 5 p.m. deadline loomed he had 17 playable (and fun!) levels completed. You could play our game for a minute; his for a half hour.
Part of Danny’s success can be attributed to keeping the scope manageable, being intimately familiar with his tools, and having boatloads of prior experience. The real secret though was his focus on content first. Before building the run-and-jump mechanics, he hacked together a level editor. With this ready on the first night of the game jam, his partner spent two full days designing levels while Danny focused on core gameplay. On Sunday he took the levels, plugged them into his engine, and voilà: I Hate Ice Levels was a full game ready to play.
So, level editors, the point of this post. When we developed Orbert, a 2D physics puzzler for mobile, I took this lesson to heart and focused first on how we’d build levels. We had limited time and resources, but we knew that without much content it would be a hard sell. Our efforts to make level editing fast and enjoyable paid off. By the time we put the finishing touches on Orbert it offered 100 levels to justify the $2 price tag.
Allow me to share the approach we took.1
Painting Levels
In the past our level editing strategy (and, I suspect, that of many fellow developers) consisted of constructing prefabs then dragging them to suitable positions in the editor. Though simple, this approach is problematic in several ways, not least of which is that it’s a slow process. What we desired was a suite of tools like those found in Photoshop or Maya for sculpting a level. Rather than painstakingly placing individual tiles, we wanted to be able to “paint” terrain.
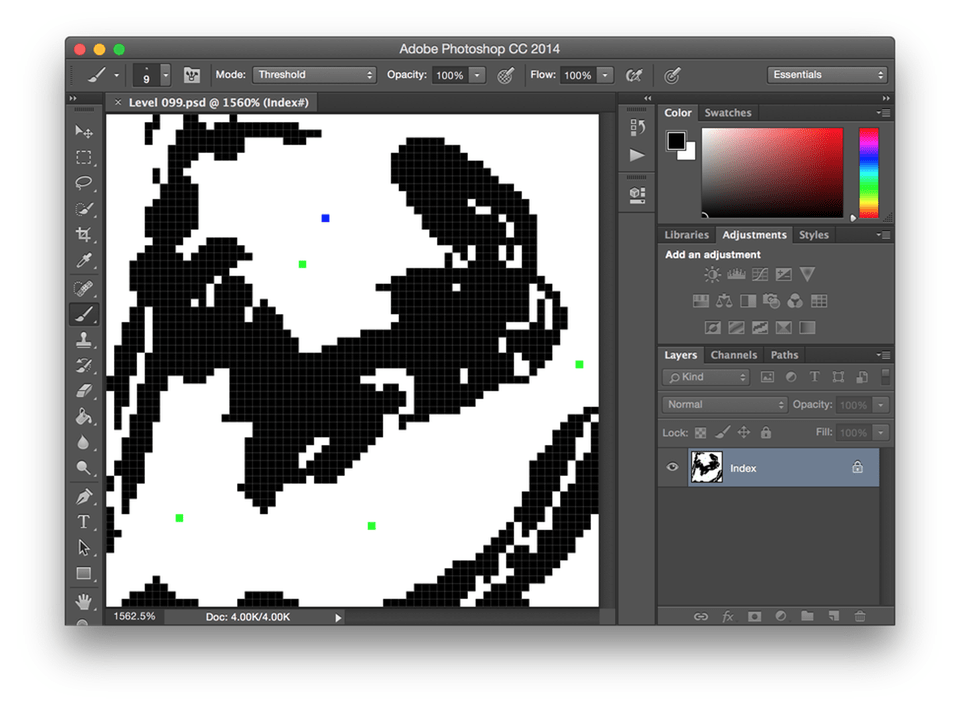
This lead us to think: why not use Photoshop itself? It already played an indispensible role in our workflow and its painting tools are top notch; a natural fit. We planned to use a tile-based level system, so each pixel could represent a square and we could use the colour of the pixel to identify which tile / prefab it represents. Black pixels for terrain, green for planets, blue for spawn points, and so forth. As long as all the developers knew which colours represented which tiles (an easy task since there were only two of us), constructing levels would be straightforward.
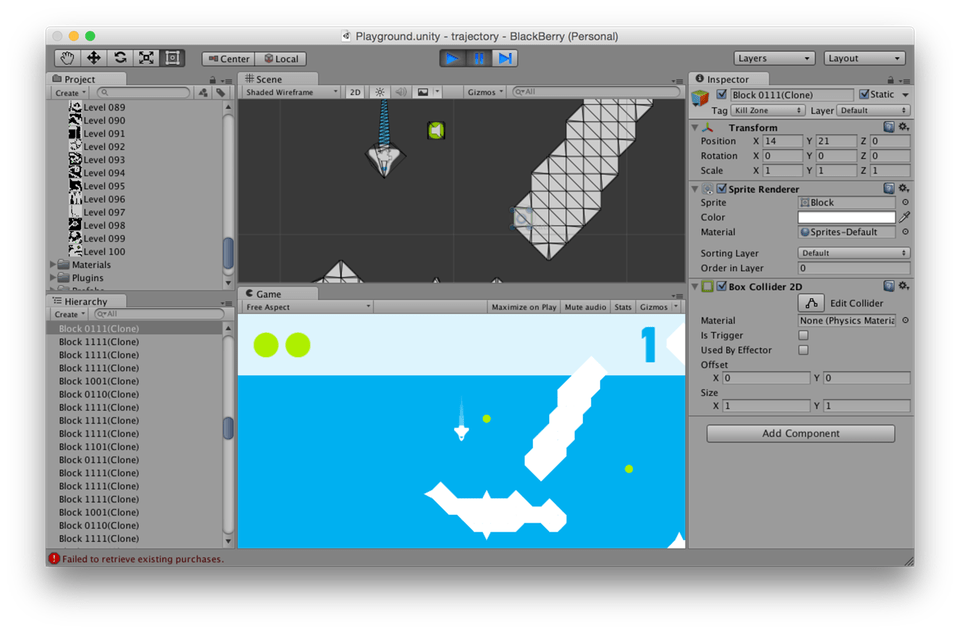
In Unity, a C# script reads the colour values of the pixels and instantiats their corresponding prefabs at runtime.2 Texture2D.GetPixels makes this step a cinch.
static Dictionary<Color, Tile> colorMap = new Dictionary<Color, Tile>()
{
	{ Color.white, EmptyTile },
	{ Color.green, PlanetTile  },
	{ Color.blue,  SpawnTile },
	{ Color.black, TerrainTile },
};

/// <summary>
/// Gets a map from an image, where each pixel represents a tile.
/// </summary>
/// <param name="imageMap">Image-based map.</param>
/// <returns>Level map.</returns>
static Tile[][] LoadMap (Texture2D imageMap)
{
	var map = new Tile[imageMap.height][];
	var pixels = imageMap.GetPixels();

	for (var row = 0; row < imageMap.height; row++) {
		map[row] = new Tile[imageMap.width];

		for (var col = 0; col < imageMap.width; col++) {
			var pixel = pixels[row * imageMap.width + col];
			map[row][col] = colorMap[pixel];
		}
	}

	return map;
}
One trick that eases this process is setting the colour mode in Photoshop to indexed colour then specifying colours that correspond with the tiles your game uses. With indexed colour, if you choose a value close to #00ff00, Photoshop snaps it to the exact value. When you read the value in Unity, it equals Color.green as expected.
To stitch the terrain tiles together in a visually pleasing way, we use several different sprites combined with a technique called bitmasking. I’ll avoid going into details here, but for an excellent overview of bitmasking check out Adventures in Bitmasking from Angry Fish Games.
This approach works well for Orbert, but it admittedly only does so because the game has limitations that lend themselves well to such a simplified editor. It employs a handful of tiles, making remembering which colours represent each effortless. It also lacks any “moving parts” apart from the player. If we want RPCs that shuffle around the level on a pre-defined path, for example, we require something more sophisticated than a 2D grid.
Nevertheless, even if an editor like the one described is too simplistic for your game, there are better options than placing prefabs manually. If your game is tile-based, consider using an application like the Tiled map editor . It provides sophisticated tools for creating maps and exports the result to an XML or JSON file, easily read by Unity or Unreal. Indeed, the latter’s Paper2D boasts built-in support for the JSON files that Tiled exports. Unity developers are in luck as well, with several third-party assets offering TMX support (full list of integrations here).
Not building a tile-based game? Modern game engines like Unity make building custom editor tools a breeze for the ultimate in level editor construction. It may seem like a chore when more exciting challenges await, but upfront investment pays huge dividends later in development.
Cool? Cool.